Getting started with Node.js applications on Microsoft’s Azure Kubernetes Service (AKS)
About Azure Kubernetes Service (AKS)
AKS is Microsoft's managed container environment hosted on Azure. Using Kubernetes, AKS gives you the power of orchestration for your applications with provisioning, upgrading and scaling. All of this without initial setup or ongoing maintenance. Kubernetes is an open-source system for automating deployment, scaling and management of containerised applications.
You may be asking why it's important to understand this infrastructure. With a lot of infrastructure moving towards containerised solutions it's worth understanding, as a Node.js developer, how your applications run in a production environment.
Being able to replicate a production setup on your local machine can make debugging issues quicker and easier.
Understanding the build process once you're ready to ship code can help avoid situations where developers don't understand how applications are built and run in production.
Shared knowledge can help contribute towards a collaborative environment between development and operations teams.
This post steps you through deploying a Node.js application to AKS using Helm ; beginning with replicating the setup locally and then transferring over to a hosted, production-ready environment.
Helm makes managing Kubernetes applications easier via customisable Charts which define application setup, provide repeatable installations and serve as a single point of authority.
Local setup
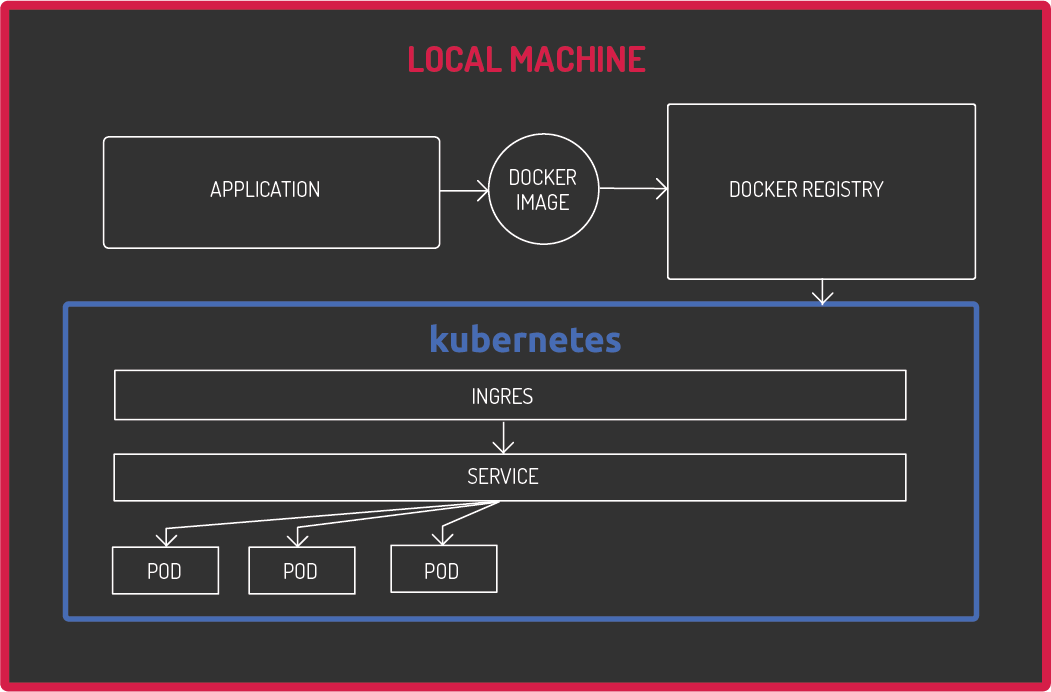
Before diving into the Azure setup, let's replicate the production setup locally. This provides you with a playground to test changes without the need to push to a hosted environment.
Heres what the local setup looks like:

We'll use macOS in this article. Developers on Windows have access to all the same functionality in the Edge version of Docker for Windows Desktop .
Initial setup
- Install the Edge version of Docker for Mac. This version provides native Kubernetes functionality out of the box.
- Once installed open 'Preferences'.
- Navigate to 'Kubernetes' and tick 'Enable Kubernetes'. Once activated this lets you run a Kubernetes cluster locally.
- Run
kubectl config get-contextsto ensure you're using the 'docker-for-desktop' context. If you've used Minikube before, you might need to switch to 'docker-for-desktop' with:kubectl config use-context docker-for-desktop - The final part of the initial setup is to run
helm initto initialise Helm and Tiller in your cluster.
Build your Docker image
- Set up a local Docker registry to store and retrieve images, this can be done with:
docker run -d -p 5000:5000 --restart=always --name registry registry:2Further details on customising your own registry can be found in the Docker documentation for deploying a registry server. - Push your first image to your local registry.
The example app for this article is react-pwa, a Progressive Web App (PWA) built in React.js with a Node.js backend.For more information on PWA's check out an in-depth article from NearForm Building Progressive Web Apps.
NearForm provides images via the Docker Hub for Node.js 8 LTS, 9 and 10. These images are updated within a very short time of any Node.js release or OS base image change. Commercial support is available for 8 LTS.There are images for CentOS, Red Hat Enterprise Linux and Alpine Linux.The Dockerfile being used is available at ./infrastructure/docker/app.Dockerfile, it uses NearForm's Node.js Alpine image.
FROM nearform/alpine3-s2i-nodejs:8# Create app directory WORKDIR /opt/app-root/src
COPY package*.json ./ RUN yarn install --production=false COPY . .
RUN yarn run build
EXPOSE 3000
CMD [ "yarn", "start" ]
- Build the image by running the following command:
docker build . --tag react-pwa --file infrastructure/docker/app.DockerfileGenerally, you tag images with a specific version number but for local development, this is not necessary. Using the latest version allows you to run the same build command each time you need to rebuild the image.Once built see the image listed by running the command
docker images.
Install Your Application Stack
To build your Kubernetes deployment, service and ingress run the following command:
helm install infrastructure/deployment/charts/app --name react-pwa -f infrastructure/deployment/charts/app/values.dev.yamlA Helm chart is a collection of files describing Kubernetes resources using templates and configuration files.
Templates use values from configuration files, the default being values.yaml or from overrides defined on the command line using the --set flag.
Rather than taking the values from the default values.yaml file pass in an override file called values.dev.yaml with specific settings for local deployment.
To ensure everything is up and running run kubectl get pods .
This gives you a list of pods and their status.
If for any reason any of the pods don't have the 'Running' status then it's likely that there was a problem with the installation.
Run kubectl describe pod react-pwa-app- to list the events that took place during installation.
Another useful command you can run against your pods is kubectl logs react-pwa-app- . If your application is 'Running' then you can see the logs from your application initialisation.
Once your pods are up and running set up an NGINX ingress controller daemon to act as a load balancing proxy for your applications.
Run the following command:
helm install stable/nginx-ingress --name local-nginxRather than creating your own charts, you can use charts from the Helm registry for this.
The controller listens for deployments or changes to ingress resources, updates its NGINX config and reloads when required.
Finally, add a host entry to map localhost:80 to hn.nearform.local, you can do that with the following command:
echo "127.0.0.1 hn.nearform.local" | sudo tee -a /etc/hostsNow navigate to hn.nearform.local in your browser to see your application running.
If you get a response but it's not what you're expecting then make sure there isn't anything already running on port 80, you can check by running the following command:
sudo lsof -i :80 | grep LISTENIf there is something else running you may be able to disable it with the following command:
sudo launchctl unload -w /System/Library/LaunchDaemons/org.apache.httpd.plistNow you have a local setup close to production that can be ported over to Azures hosted solution!
To update your application in the cluster re-run the docker build command to rebuild the image and then run upgrade with Helm:
helm upgrade react-pwa infrastructure/deployment/charts/app -f infrastructure/deployment/charts/app/values.dev.yamlAKS setup
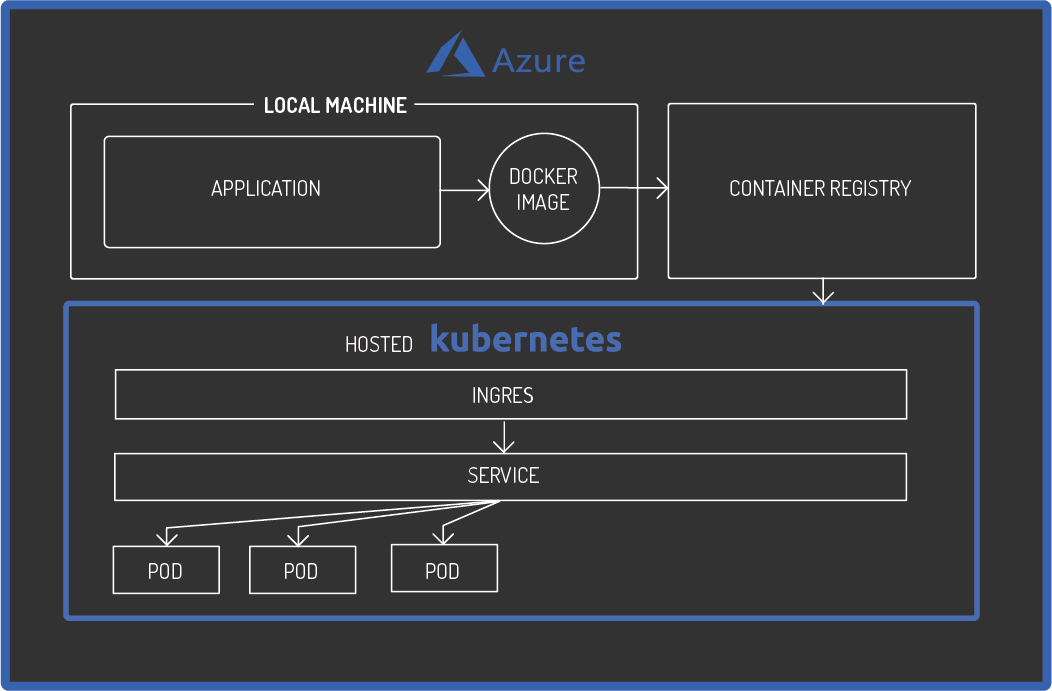
Now that you're running locally its time to port it over to a hosted environment to create an externally accessible application.
Heres what the setup looks like on AKS: as you can see it mirrors our local setup closely.

Initial setup
Microsoft already has some very good documentation on setting up your Kubernetes cluster and a container registry on Azure. I'd highly recommend following the guide on setting up your Azure environment .
What isn't covered here though, and what we'll go over in this post, is the use of Helm for AKS deployments.
Push your Docker image
- Tag the Docker image created earlier so you can push it to the Azure Container Registry. Tag your image with a version number and the
, which is the name of the registry you created on Azure:docker tag react-pwa /react-pwa:0.1.0 - Push your image to the remote Azure registry using:
docker push .azurecr.io/react-pwa:0.1.0 - Check your image is in the Azure registry by using the Azure CLI:
az acr repository list --name --output table
Install Your Application Stack
- Ensure you're running against the correct Kubernetes context by running the following command:
kubectl config get-contextsThis command lists your local cluster and the cluster deployed to Azure. You can switch clusters withkubectl config use-contextwhereis the name of the cluster created on AKS. - Install the application specific resources with Helm. You don't need to pass in a specific file this time as you are using the default
values.yamlconfiguration.helm install infrastructure/deployment/charts/app --name react-pwa --set ingress.hosts={} --set imgrepo=is your chosen hostname andis the path of your hosted registry instance name on Azure. - Use
kubectl describeandkubectl logsto inspect and debug deployments. - Once those pods, services and ingress are deployed and running you can create the NGINX ingress controller daemon with:
helm install stable/nginx-ingress --name nginx-controller - As suggested by the output of the above command you can run:
kubectl --namespace default get services -o wide -w nginx-controller-nginx-ingress-controllerThis command waits for the pending IP address to be created and notifies you when its done.Once you have the external IP address, requesting it returns the default 404 response from NGINX.
- The final step is to configure your DNS to create an A record pointing the domain name specified in your Helm chart at the external IP address provided. Once the DNS change propagates your application is running on your defined hostname.To set up HTTPS and automatic HTTP to HTTPS redirects in AKS there are detailed instructions provided by Microsoft which expand upon the NGINX ingress controller setup.
Conclusion
You've taken a Node.js application and deployed it to a modern infrastructure while avoiding some of the setup and maintenance costs associated with building a production ready, scalable, containerised solution.
The declarative nature of much of this setup lends itself well to automation. The next steps are to automate the process of upgrading applications via CI as well as scripting the initial setup to be replicable for any application.
Insight, imagination and expertly engineered solutions to accelerate and sustain progress.
Contact