How to run a Public Docker Registry in Kubernetes

As a member of NearForm's DevOps team , I spend a lot of my time working with containers in Kubernetes.
In the article, I will cover the creation of a publicly accessible Docker Registry running in Kubernetes.
For the sake of keeping things simple and short, I will use basic authentication for the registry and Kubernetes node's disk volume as persistent storage for docker images.
In a production environment we could, for example, use an S3 bucket as a storage backend, but let's leave that for another article.
What are the Benefits of Building a Public Docker Registry in Kubernetes?
Sometimes your business requires you to have full control over the docker registry and doesn't want to use a third-party solution.
You may also want to extend your registry with additional logic, like vulnerability scanning of docker images or even some static analysis of application source code.
All of this is possible when you build your own docker registry.
Architecture
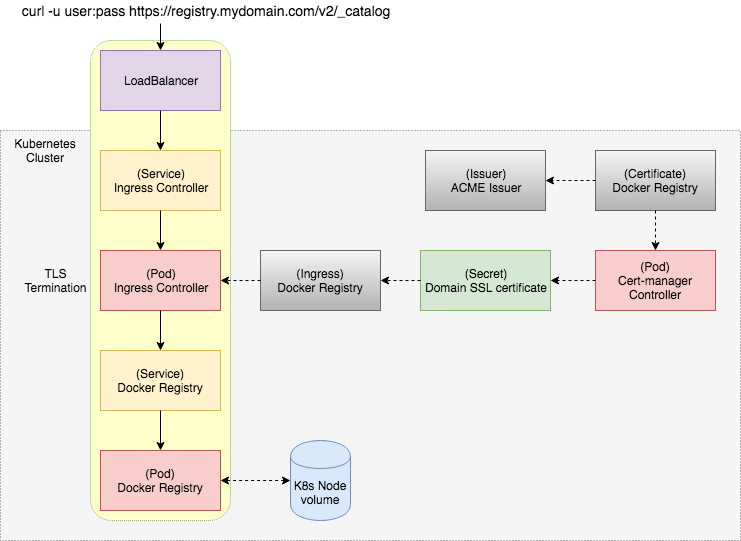
Requirements
- A Kubernetes cluster
- Nginx ingress controller enabled
- Helm installed)
- Basic knowledge of Let's Encrypt ACME
Steps
Step 1: Create a domain record pointing to our Kubernetes Cluster
If you don't know the IP address, you can find it as EXTERNAL-IP assigned to your nginx-ingress-controller service.
kubectl get svc -n kube-systemFor this article let's say we have a domain called registry.mydomain.com.
Step 2: Installation of cert-manager Kubernetes addon
Having a TLS certificate is one of the requirements to build a Docker Registry.
Fortunately, this is readily achievable with Let's Encrypt and cert-manager Kubernetes addon.
The addon automates the management and issuance of TLS certificates, and it ensures the certificates are valid periodically. It also attempts to renew them at an appropriate time before their expiration.
The installation of cert-manager is pretty straightforward:
helm install --name cert-manager --namespace kube-system stable/cert-managerIn the case of an rbac error you might need to add this parameter:
--set rbac.create=falseStep 3: Getting a TLS certificate
With cert-manager installed we now need to create Issuer and Certificate:
apiVersion: certmanager.k8s.io/v1alpha1
kind: Issuer
metadata:
  name: acme-issuer
spec:
  acme:
    email: MY-ACME-EMAIL@ME.COM
    server: https://acme-v01.api.letsencrypt.org/directory
    privateKeySecretRef:
      name: acme-issuer-account-key
    http01: {}
Issuer represents a certificate authority from which signed x509 certificates can be obtained, such as Let’s Encrypt.
Here we need to set up our ACME account email.
The email serves as a contact for expiration notices and other communication from Let’s Encrypt. It also allows you to revoke certificates in the event that a certificate’s private key is lost.
For domain validation, we have two options:
- http01 challenge
- dns01 challenge
In our case, we will use http01 challenge mechanism because it is simpler to set up.
Dns01 challenge would require additional configuration of DNS provider to automate creation of DNS records for the validation.
apiVersion: certmanager.k8s.io/v1alpha1
kind: Certificate
metadata:
  name: docker-registry
spec:
  secretName: docker-registry-tls-certificate
  issuerRef:
    name: acme-issuer
  dnsNames:
  - registry.mydomain.com
  acme:
    config:
    - http01:
        ingressClass: nginx
      domains:
      - registry.mydomain.com
Certificate defines a few essential things:
- dnsNames it is used by Issuer to issue a TLS certificate
- secretName where TLS is stored once it's obtained
- acme config for domain validation (http01 challenge mechanism)
With an HTTP-01 challenge, you prove ownership of a domain by ensuring that a particular file is present at the domain.
Thankfully this is entirely handled by cert-manager-controller which starts up a new Pod, Service, and Ingress just for the validation purpose. Once it's validated, these resources are deleted.
By applying the certificate resource to the cluster, the cert-manager-controller will start to issue the certificate.
You can follow its progress in Events of the certificate:
kubectl describe certificate docker-registryEvents:
Type Reason Age From Message
---- ------ ---- ---- -------
Warning ErrorCheckCertificate 7m cert-manager-controller Error checking existing TLS certificate: secret "docker-registry-tls-certificate" not found
Normal PrepareCertificate 7m cert-manager-controller Preparing certificate with issuer
Normal PresentChallenge 7m cert-manager-controller Presenting http-01 challenge for domain registry.mydomain.com
Normal SelfCheck 7m cert-manager-controller Performing self-check for domain registry.mydomain.com
Normal ObtainAuthorization 5m cert-manager-controller Obtained authorization for domain registry.mydomain.com
Normal IssueCertificate 5m cert-manager-controller Issuing certificate...
Normal CeritifcateIssued 5m cert-manager-controller Certificated issued successfully
Normal RenewalScheduled 4m (x2 over 5m) cert-manager-controller Certificate scheduled for renewal in 1438 hoursIf everything goes well, you should find your certificate here:
kubectl describe secret docker-registry-tls-certificateStep 4: Set up htpasswd for Basic Auth
For Basic Auth in the Docker Registry, we need to create a htpasswd.
We can use htpasswd tool from apache-utils or docker registry container.
Let's have a user called admin with password admin123:
docker run --entrypoint htpasswd --rm registry:2 -Bbn admin admin123 | base64On the output we get htpasswd in base64 format ready to be stored in a Secret:
apiVersion: v1
kind: Secret
metadata:
  name: docker-registry
type: Opaque
data:
  HTPASSWD: YWRtaW46JDJ5JDA1JHJwWHlibVNIMWhEV2VFYjJJUHg5aS5ENmh0MVZjMVBob3YyUnlXSEQzOFdEM1EvYlQ3em8uCgo=
Step 5: Configuration of Docker Registry
Here we have the most basic config of Docker Registry where we define auth method to be Basic Auth with a path to a htpasswd file.
Mounting our htpasswd secret is handled in our Pod definition.
apiVersion: v1
kind: ConfigMap
metadata:
  name: docker-registry
data:
  registry-config.yml: |
    version: 0.1
    log:
      fields:
        service: registry
    storage:
      cache:
        blobdescriptor: inmemory
      filesystem:
        rootdirectory: /var/lib/registry
    http:
      addr: :5000
      headers:
        X-Content-Type-Options: [nosniff]
    auth:
      htpasswd:
        realm: basic-realm
        path: /auth/htpasswd
    health:
      storagedriver:
        enabled: true
        interval: 10s
        threshold: 3
It is also possible to setup Basic Auth on Ingress level, but I prefer to do it here as it can be changed to a Token Auth at a later time.
Docker registry auth options can be found here .
Step 6: Docker Registry Pod definition
Now with everything prepared and ready, we can define a pod:
apiVersion: v1
kind: Pod
metadata:
  name: docker-registry
  labels:
    name: docker-registry
spec:
  volumes:
    - name: config
      configMap:
        name: docker-registry
        items:
          - key: registry-config.yml
            path: config.yml
    - name: htpasswd
      secret:
        secretName: docker-registry
        items:
        - key: HTPASSWD
          path: htpasswd
    - name: storage
      emptyDir: {}
  containers:
    - name: docker-registry
      image: registry:2.6.2
      imagePullPolicy: IfNotPresent
      ports:
        - name: http
          containerPort: 5000
          protocol: TCP
      volumeMounts:
        - name: config
          mountPath: /etc/docker/registry
          readOnly: true
        - name: htpasswd
          mountPath: /auth
          readOnly: true
        - name: storage
          mountPath: /var/lib/registry
Step 7: Exposing the Docker Registry
First, we create a Service with proper port binding:
apiVersion: v1
kind: Service
metadata:
  name: docker-registry
spec:
  type: ClusterIP
  ports:
    - name: http
      protocol: TCP
      port: 5000
      targetPort: 5000

  selector:
    name: docker-registry
Finally, we create an Ingress.
apiVersion: extensions/v1beta1
kind: Ingress
metadata:
  name: docker-registry
  annotations:
    kubernetes.io/ingress.class: nginx
    nginx.ingress.kubernetes.io/proxy-body-size: "0"
    certmanager.k8s.io/issuer: acme-issuer
spec:
  tls:
  - hosts:
    - registry.mydomain.com
    secretName: docker-registry-tls-certificate
  rules:
  - host: registry.mydomain.com
    http:
      paths:
      - backend:
          serviceName: docker-registry
          servicePort: 5000
Here we need to refer to the secret with TLS certificate for its termination and define domain binding to a docker-registry Service.
To allow a docker client to push to our registry we need to add nginx.ingress.kubernetes.io/proxy-body-size: "0" annotation to turn off the maximum size of incoming data.
Step 8: All done, let's test it!
Finally, we should be able to access our docker registry:
curl -u admin:admin123 https://registry.mydomain.com/v2/_catalogWe should also be able to push any docker image to it:
docker login https://registry.mydomain.com -u admin -p admin123
docker pull busybox:latest
docker tag busybox:latest registry.mydomain.com/busybox:latest
docker push registry.mydomain.com/busybox:latest
Summary
Now we have our own registry running in Kubernetes with ongoing TLS support.
We can integrate other tools like Clair to scan those images or use the registry's notifications system to trigger other workflows.
Now that we have our own registry running read about how to analyse docker images with Clair using this example.
Image: Erol Ahmed
Insight, imagination and expertly engineered solutions to accelerate and sustain progress.
Contact