Stop onboarding. Start shipping: how to master legacy code in 20 minutes.Stoponboarding.Startshipping:howtomasterlegacycodein20minutes.Stoponboarding.Startshipping:howtomasterlegacycodein20minutes.
Carmine Sacco
21 May 2026
Share
Senior software engineer explores how we are adopting BMad in brownfield projects at Nearform to turn legacy liabilities into modern assets, drastically increasing productivity and improving code quality.
There’s a recurring nightmare many developers face: You are dropped into a "brownfield" project — an existing codebase with five years of history, three different architectural styles, and zero up-to-date documentation or handover. Usually, this means weeks of "archaeology" before you feel safe changing a single line of code.
In the era of agentic AI, frameworks utilising spec-driven development (”SDD”) are gaining traction for generating software faster by defining strict rules for agents to follow. While SDD is incredibly powerful when you already know the final product you want to build from scratch, the true enterprise challenge lies in taming legacy code. Among SDD frameworks, this is where the BMad Method (”Breakthrough Method of Agile AI Driven Development”) sets itself apart. Instead of blindly generating new code, BMad provides a specialised team of AI agents equipped with dedicated Brownfield Development workflows designed to analyse, respect, and safely integrate with your existing systems.
In this article, we will explore how we are adopting BMad in brownfield projects at Nearform to turn legacy liabilities into modern assets, drastically increasing productivity and improving code quality.
We are going to look at two common and recurring scenarios:
Solo developer
Zero documentation
We’ll see how to apply BMad in each case and share tips and tricks to accelerate your daily work.
BMad: a full-stack AI framework
Before we get into the workflows, let’s clarify what BMad is and why it matters for agentic development. BMad is an open-source framework created by Brian Madison in order to bring the Agile methodology to the world of agentic AI. The idea behind BMad is to create a team of agents, just as in Agile teams, to move from concept to the final product. The collection of BMad agents is as follows, with each identified by a persona. (We’ll be using the agent collection and framework in BMad v6.0, the most current stable version at the time of this writing).
Most major development environments can be configured to have all these agents already preloaded (VS Code mode) in the agents menu, or to be available for direct invocation in an AI chat (Claude or Cursor mode) via /<bmad-agent-name>.
How to set up BMad in your project
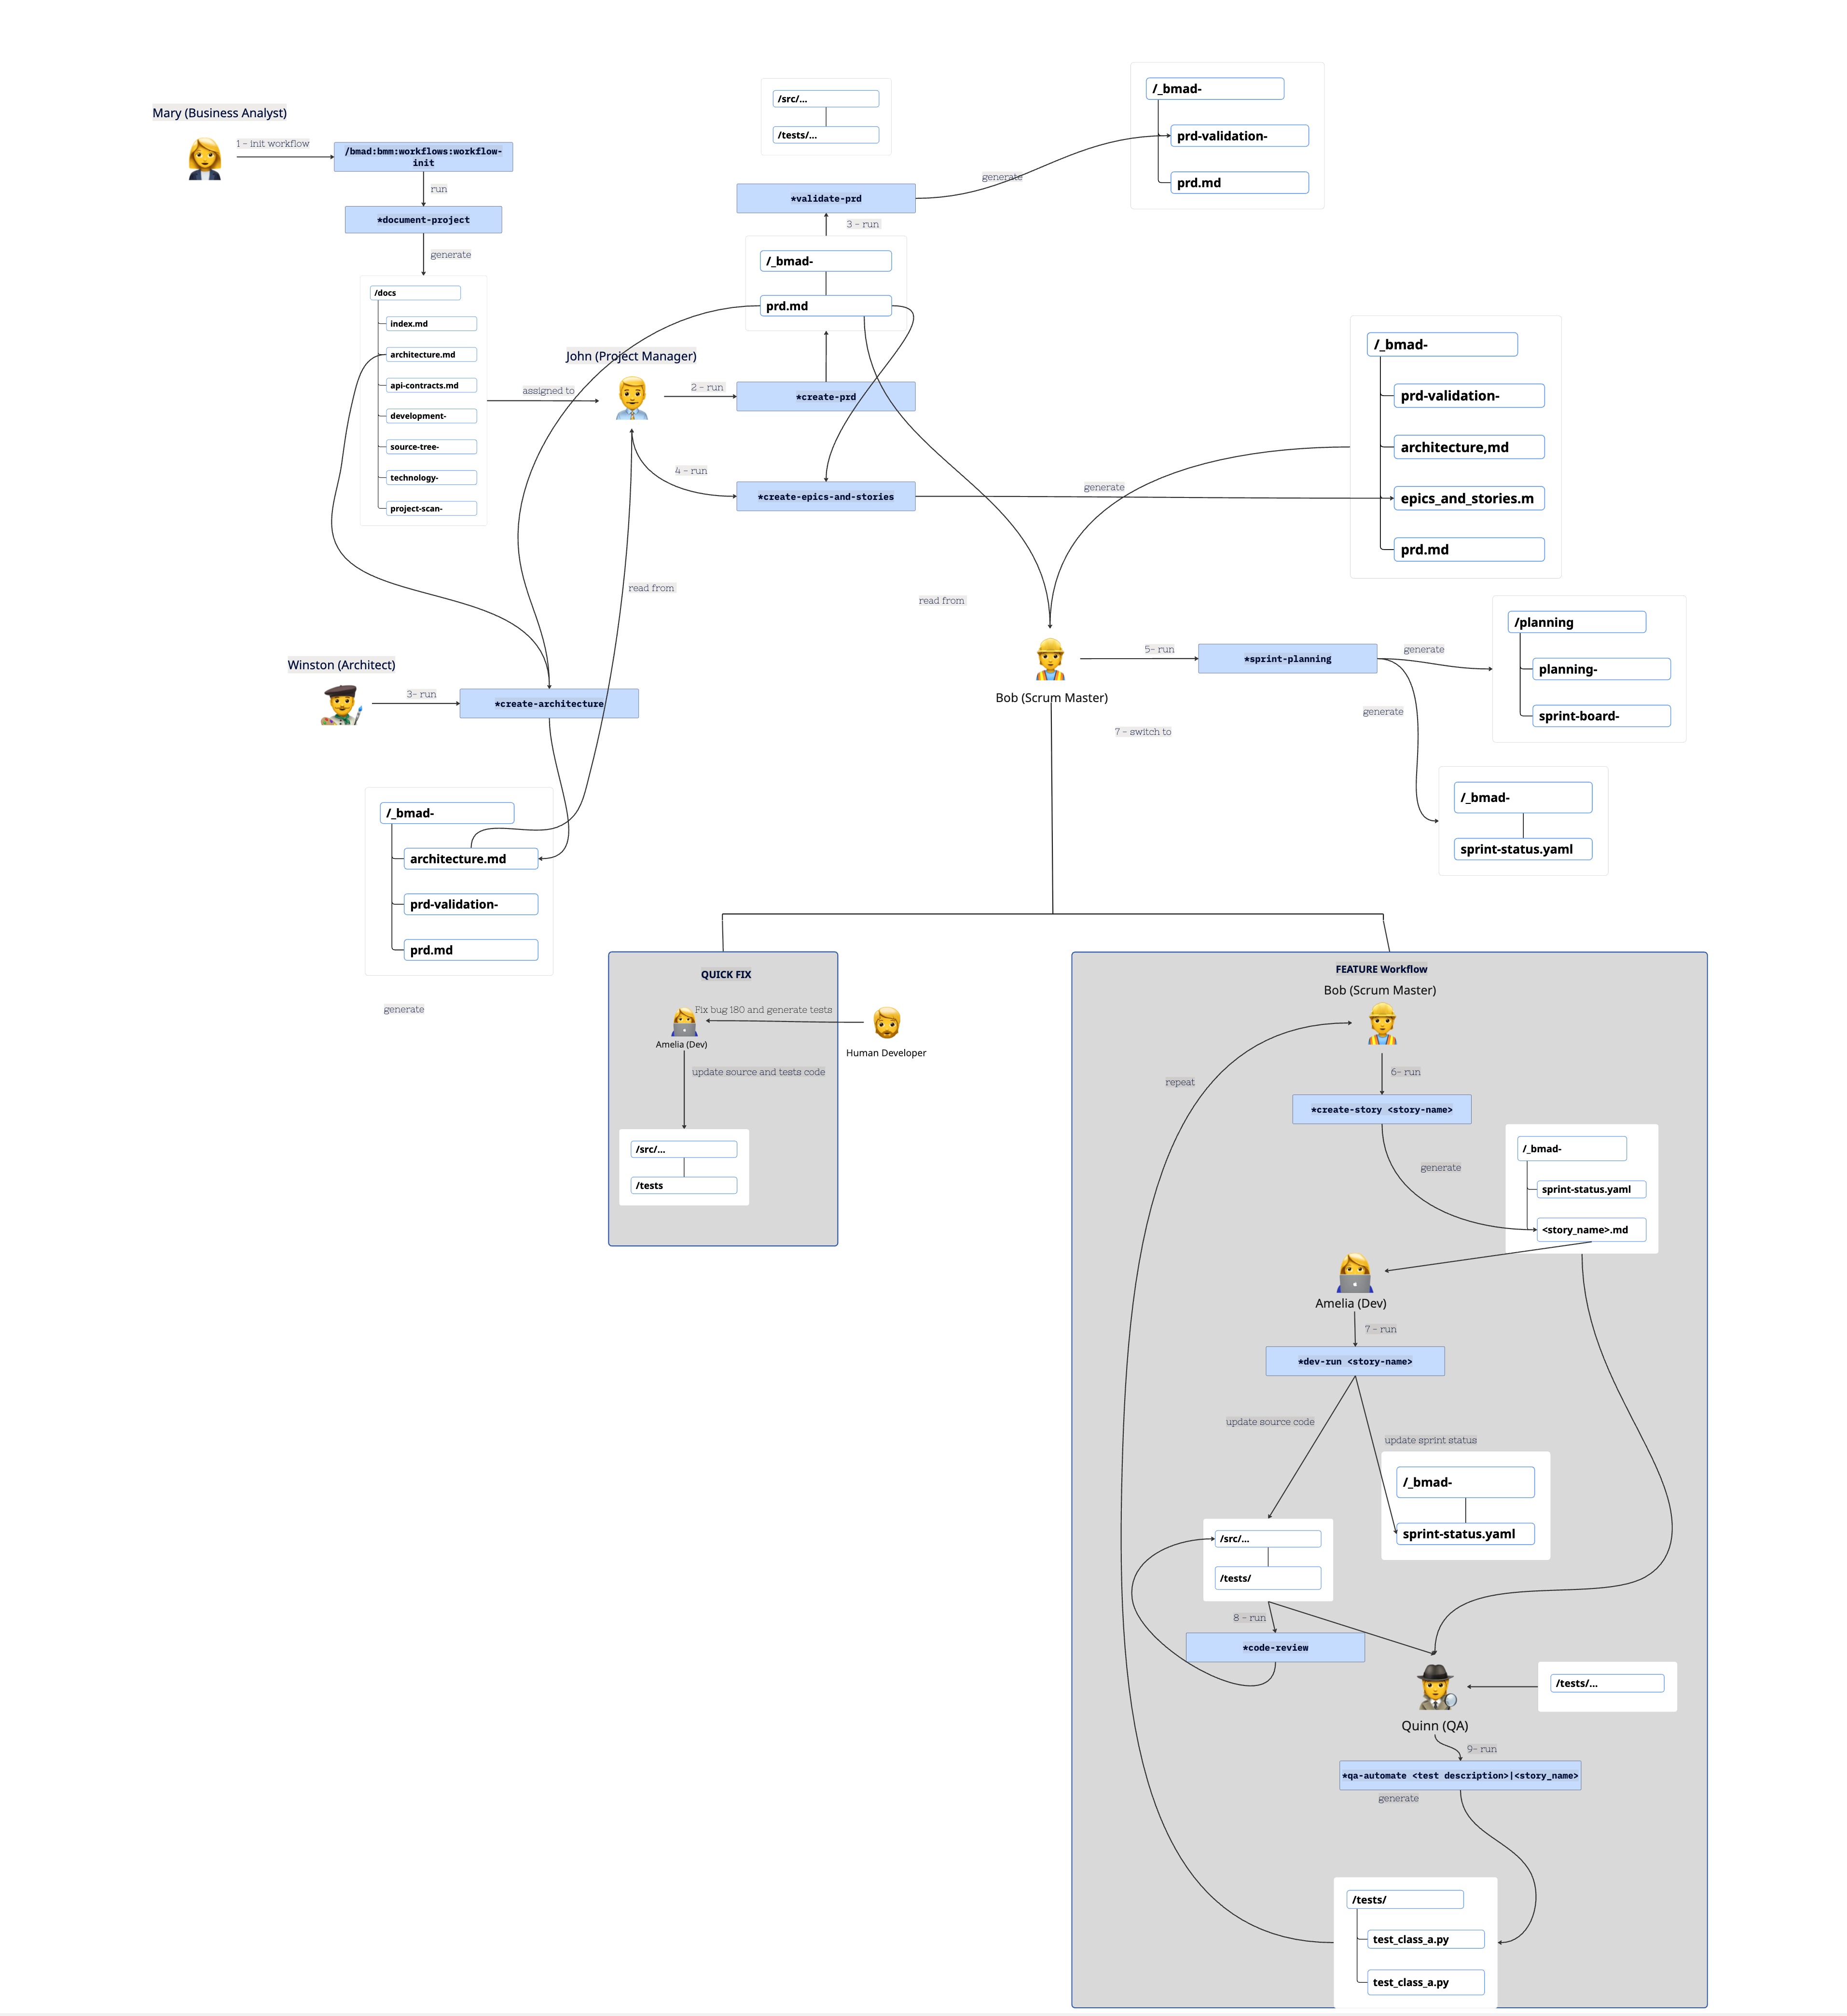
BMad is strongly focused on building workflows, which are sequences of steps an agent must follow to generate a document, conduct a review, or implement a feature. Each agent in BMad has multiple workflows, each invoked by a specific command. The workflow and interactions with agents will depend heavily on the project context and the desired goal.
Here is the main workflow, which can be customised to your project's needs.
Before going ahead to investigate the several scenarios, we have to install BMad in our brownfield project via:
$ npx bmad-method@6.0.4 install
bash
The installer will prompt you to choose:
Main folder for BMad inside the project.
Output folder for the documentation generated and used by BMad agents.
BMad modules to install. The essential ones are:
a. BMad Method Agile-AI Driven-Development
b. BMad Builder
IDEs adopted for developing with BMad.
Now that BMad is configured, you can open your favourite IDE and start working on the new feature for the project.
The typical workflow will be:
Business Analyst, Mary:
a. Init workflow: /bmad:bmm:workflows:workflow-init
b. Run document project: *document-project generates all documents needed for understanding the project.
Tip: if good documentation is available inside the project, guide the agent to use it.
Output:docs/
When the documentation has been created, ask someone with strong expertise in the project to review it to gather feedback and avoid incorrect instructions.
Switch to Product Manager, John:
a. Create Product Requirements Document:*create-prd generates the most important document for BMad agents, since it contains all information about the project, its goals, its functional and non-functional requirements.
Tip: If a task list or Excel file already exists, point the agent at it when generating the PRD, as it captures the existing roadmap.
Output:_bmad-output/planning-artifacts/prd.md
Switch to Architect, Winston:
a. Create Architecture: *create-architecture generate a Markdown document adopted by the agent to understand which component will be affected by a specific feature. In addition, you will guide the agent in making key technical decisions.
a. Create Epics and stories: *create-epic-and-stories starting from PRD and architecture. It’s really important that you add context from existing tasks, as this helps you follow the existing roadmap.
a. Create Story: *create-story <story-name> where story name must be inside epics_and_stories.md. It will generate a Markdown file for the specific story, containing all tasks related to that story.
a. Dev Story: *dev-story <story-name> will update code, documentation and configuration according to tasks available into <story_name>.md In this phase all the code required for implementing the story is generated, including testing if required.
b. Test code: Run the code yourself to verify that everything works as you expected for that feature.
c. Run code review: *code-review comments the code that has been written checking for quality, security, and architecture alignment.
Switch to QA, Quinn:
a. Quality Automation: *qa-automate performs a quality analysis of the implementation performed by Amelia. Quinn will check that all tasks and use cases are covered by tests and verify that the implementation complies with the project's quality standard. In addition, if Amelia misses any tests, particularly e2e tests, Quinn will add them and improve code quality.
Quinn will generate a report test-summary.md to track all tests, quality and future improvements to apply.
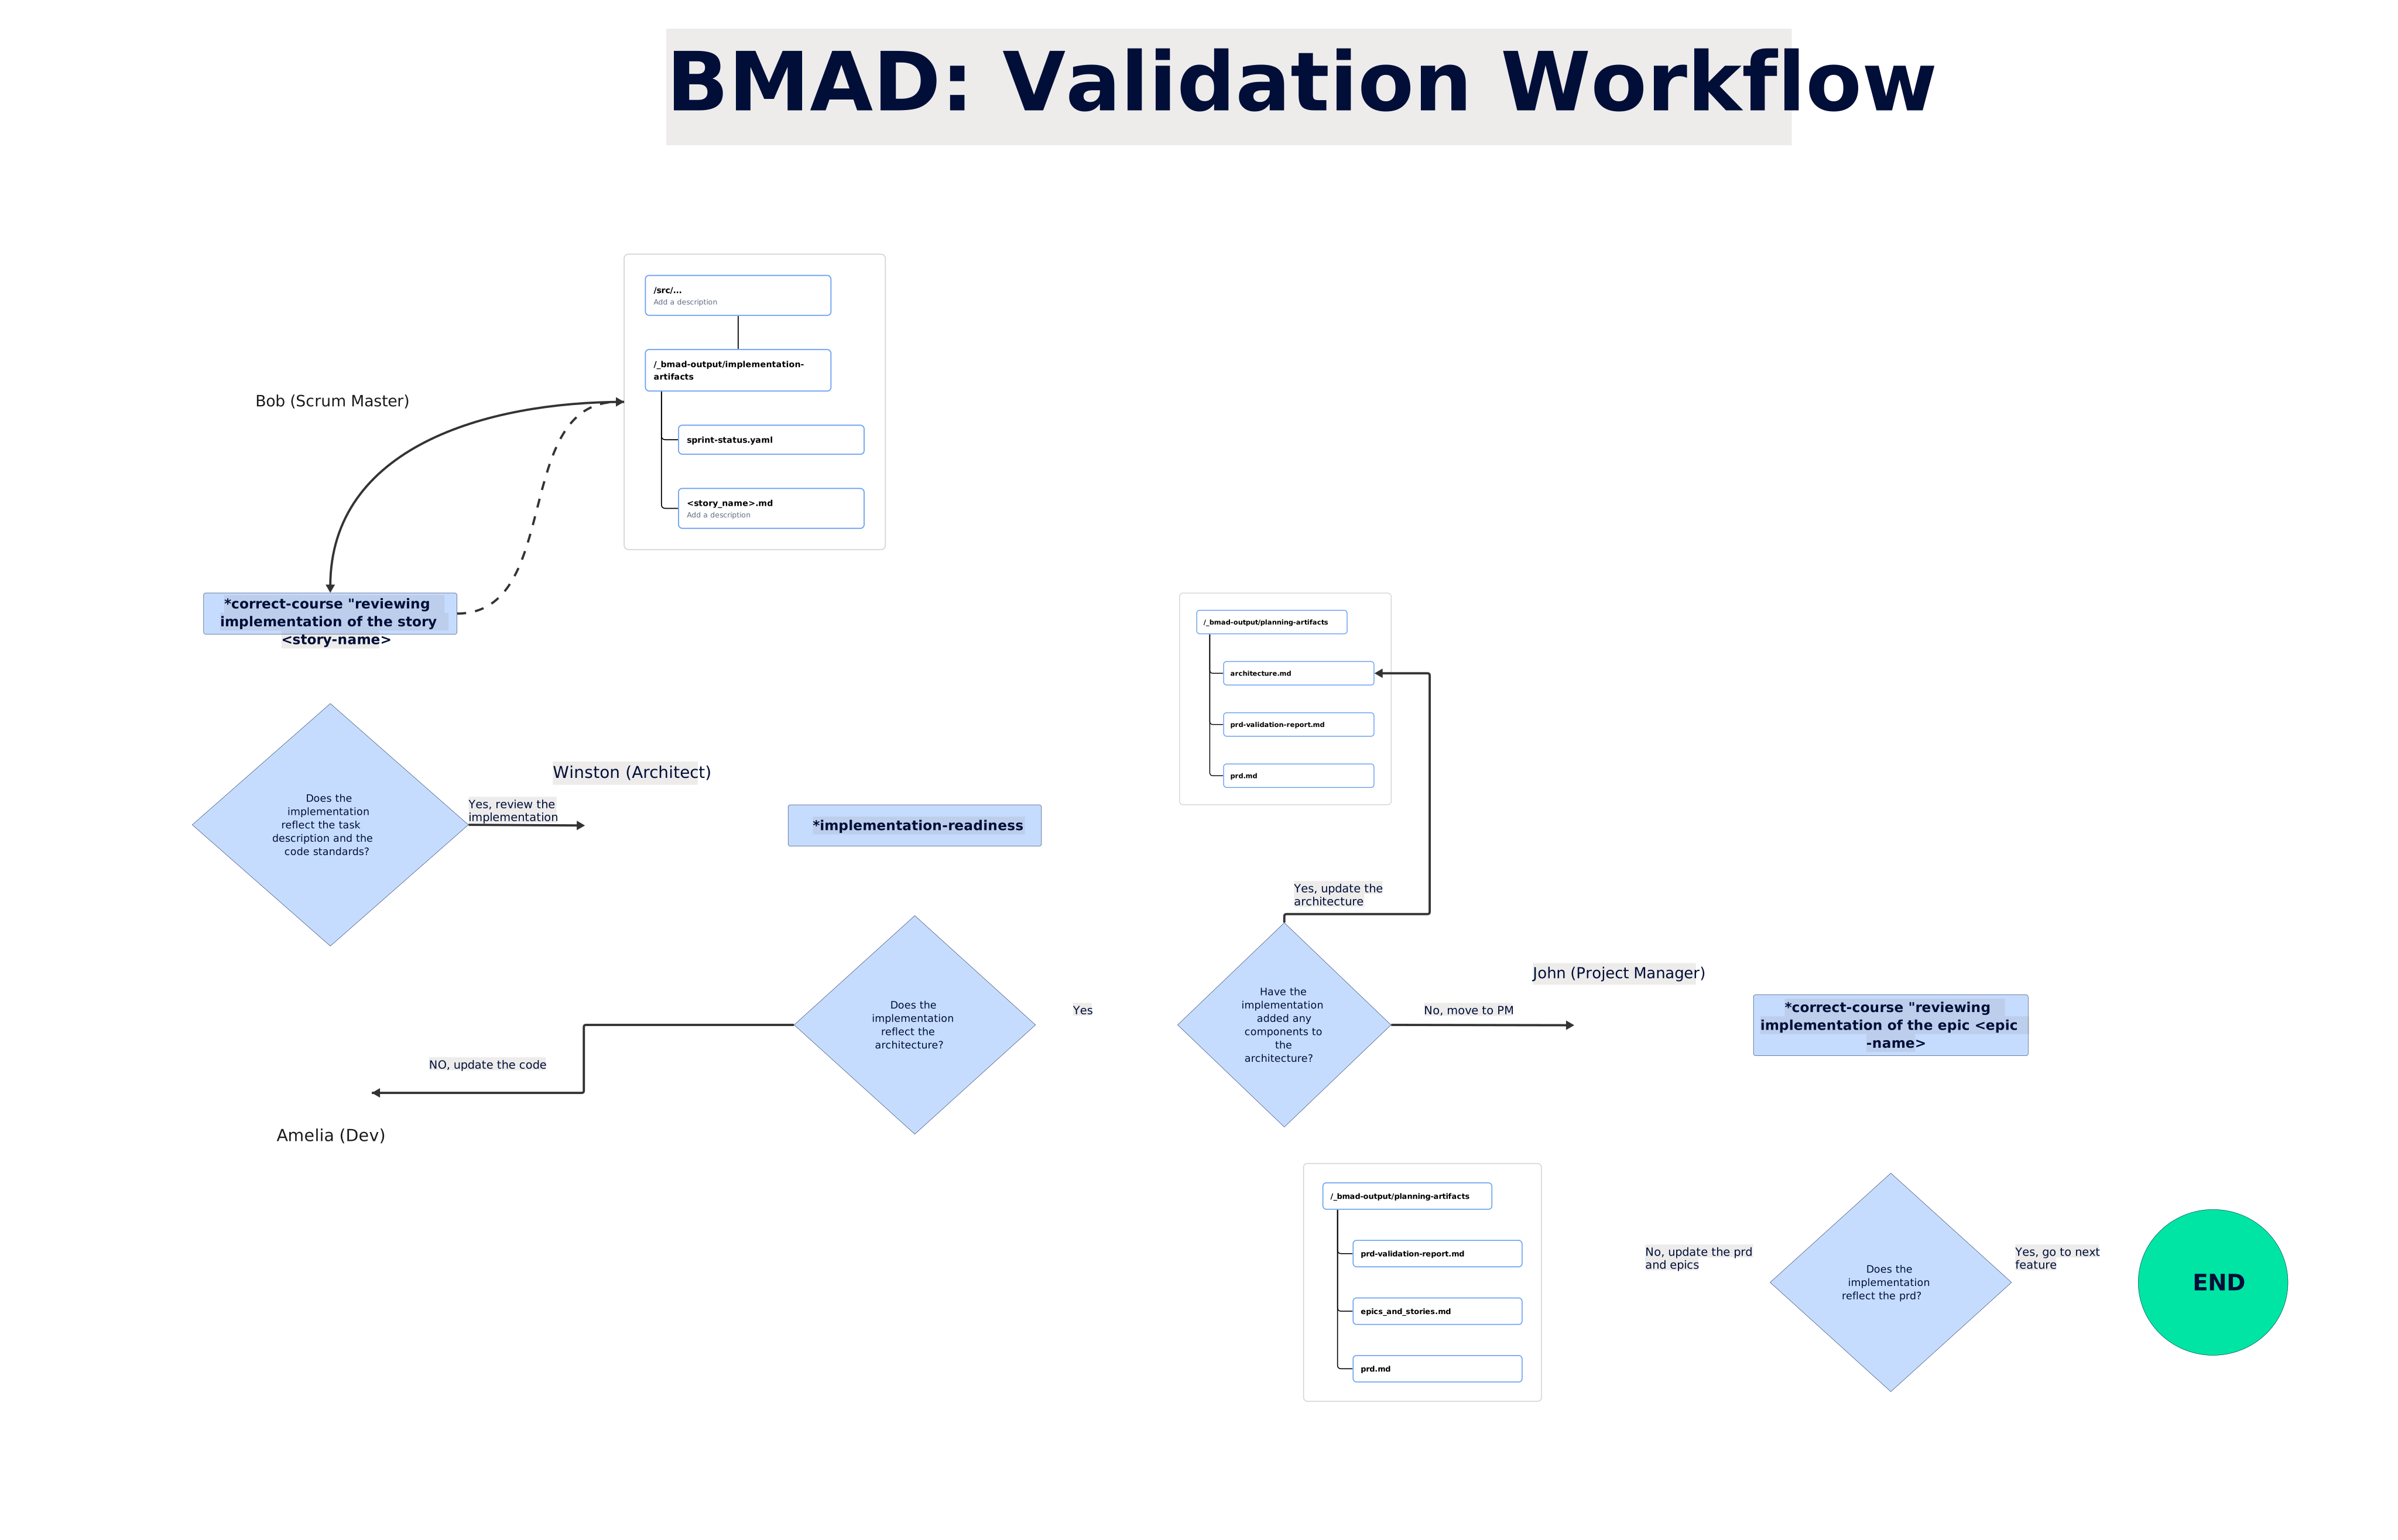
Run validation workflow: it’s a special workflow that allows Bob, Winston and John to review the written code for the story and accept the story as completed if the implementation is compliant with the accepted decisions.
Repeat the workflow from step 5 until all stories for that epic are completed.
BMad validation workflow
After the feature implementation, a useful workflow is the Validation Workflow. This flow allows agents to examine and confirm that the dev agent implementation reflects the task, code standards, and the expectations of the other agents, in accordance with the roadmap and project goals as described in the PRD.
During the implementation phase, something can change due to a technical issue or a change in customer requirements. The validation workflow allows updating tasks, epics, and PRDs to reflect this change and to correct the dev agent implementation to handle the new updates.
This validation workflow can be applied in different ways according to which phase you want to report the update:
At the end of the implementation phase, if you want to validate the code made by the dev agent
During the implementation, if you want to update the current task in order to provide additional information or change a particular requirement that is going to be satisfied in the current task
After the PRD generation, if you need to add some information that has been missed to the PRD.
Taking these workflows into consideration, we are going to discuss how to efficiently adopt BMad in the following contexts:
Solo developer
Zero documentation
Each scenario will customise this main workflow to their specific project, team, and timeline needs.
Solo dev scenario
As a freelancer or a consultant, you are typically involved in a software project where you have to develop new features or solve problems found in the production environment, but you don’t have any technical support from your customer. You can decide between one of the possible approaches for this case:
Run the whole workflow as described above: you are generating a lot of documentation before starting the feature implementation. It can take a few hours to complete, depending on the project's complexity. Time approx. ~2 hours.
Generate the documentation, docs + PRD + architecture, and then use the dev agent for solving a specific bug or implementing a specific algorithm or class. You will load the dev agent, then interact with it the same as you would with Copilot or Claude Code. Time approx. ~20 min.
Run a quick flow solo dev: quick-flow-solo-dev is a particular workflow for the Barry (solo developer) agent which will run immediately with coding task instead of generating documentation.
Using this agent, you can run the following commands:
*quick-spec generates stories and brief specifications without generating PRD.
*quick-dev implements the feature.
*code-review generates comments and reports about the implementation.
Repeat until you have done all important features.
Time approx ~10 min according to the feature complexity.
Zero documentation
Many projects have low-quality or non-existent documentation. And all too often, the project's owner is no longer available. In such situations, developers can suddenly find themselves on the hook for a difficult fix to a critical bug right from the very beginning.
If you are somehow the unicorn that is the top expert in the project’s entire tech stack, and it all seamlessly clicks, then you can just try to solve it all by yourself. But for the rest of us (and the much more common case), BMad can quickly provide the knowledge and context you are missing. To leverage this, a developer would first find the tool with the bug report before running the whole BMad workflow.
For the purposes of this article, we'll assume issues are tracked in GitHub and aligned with our roadmap.
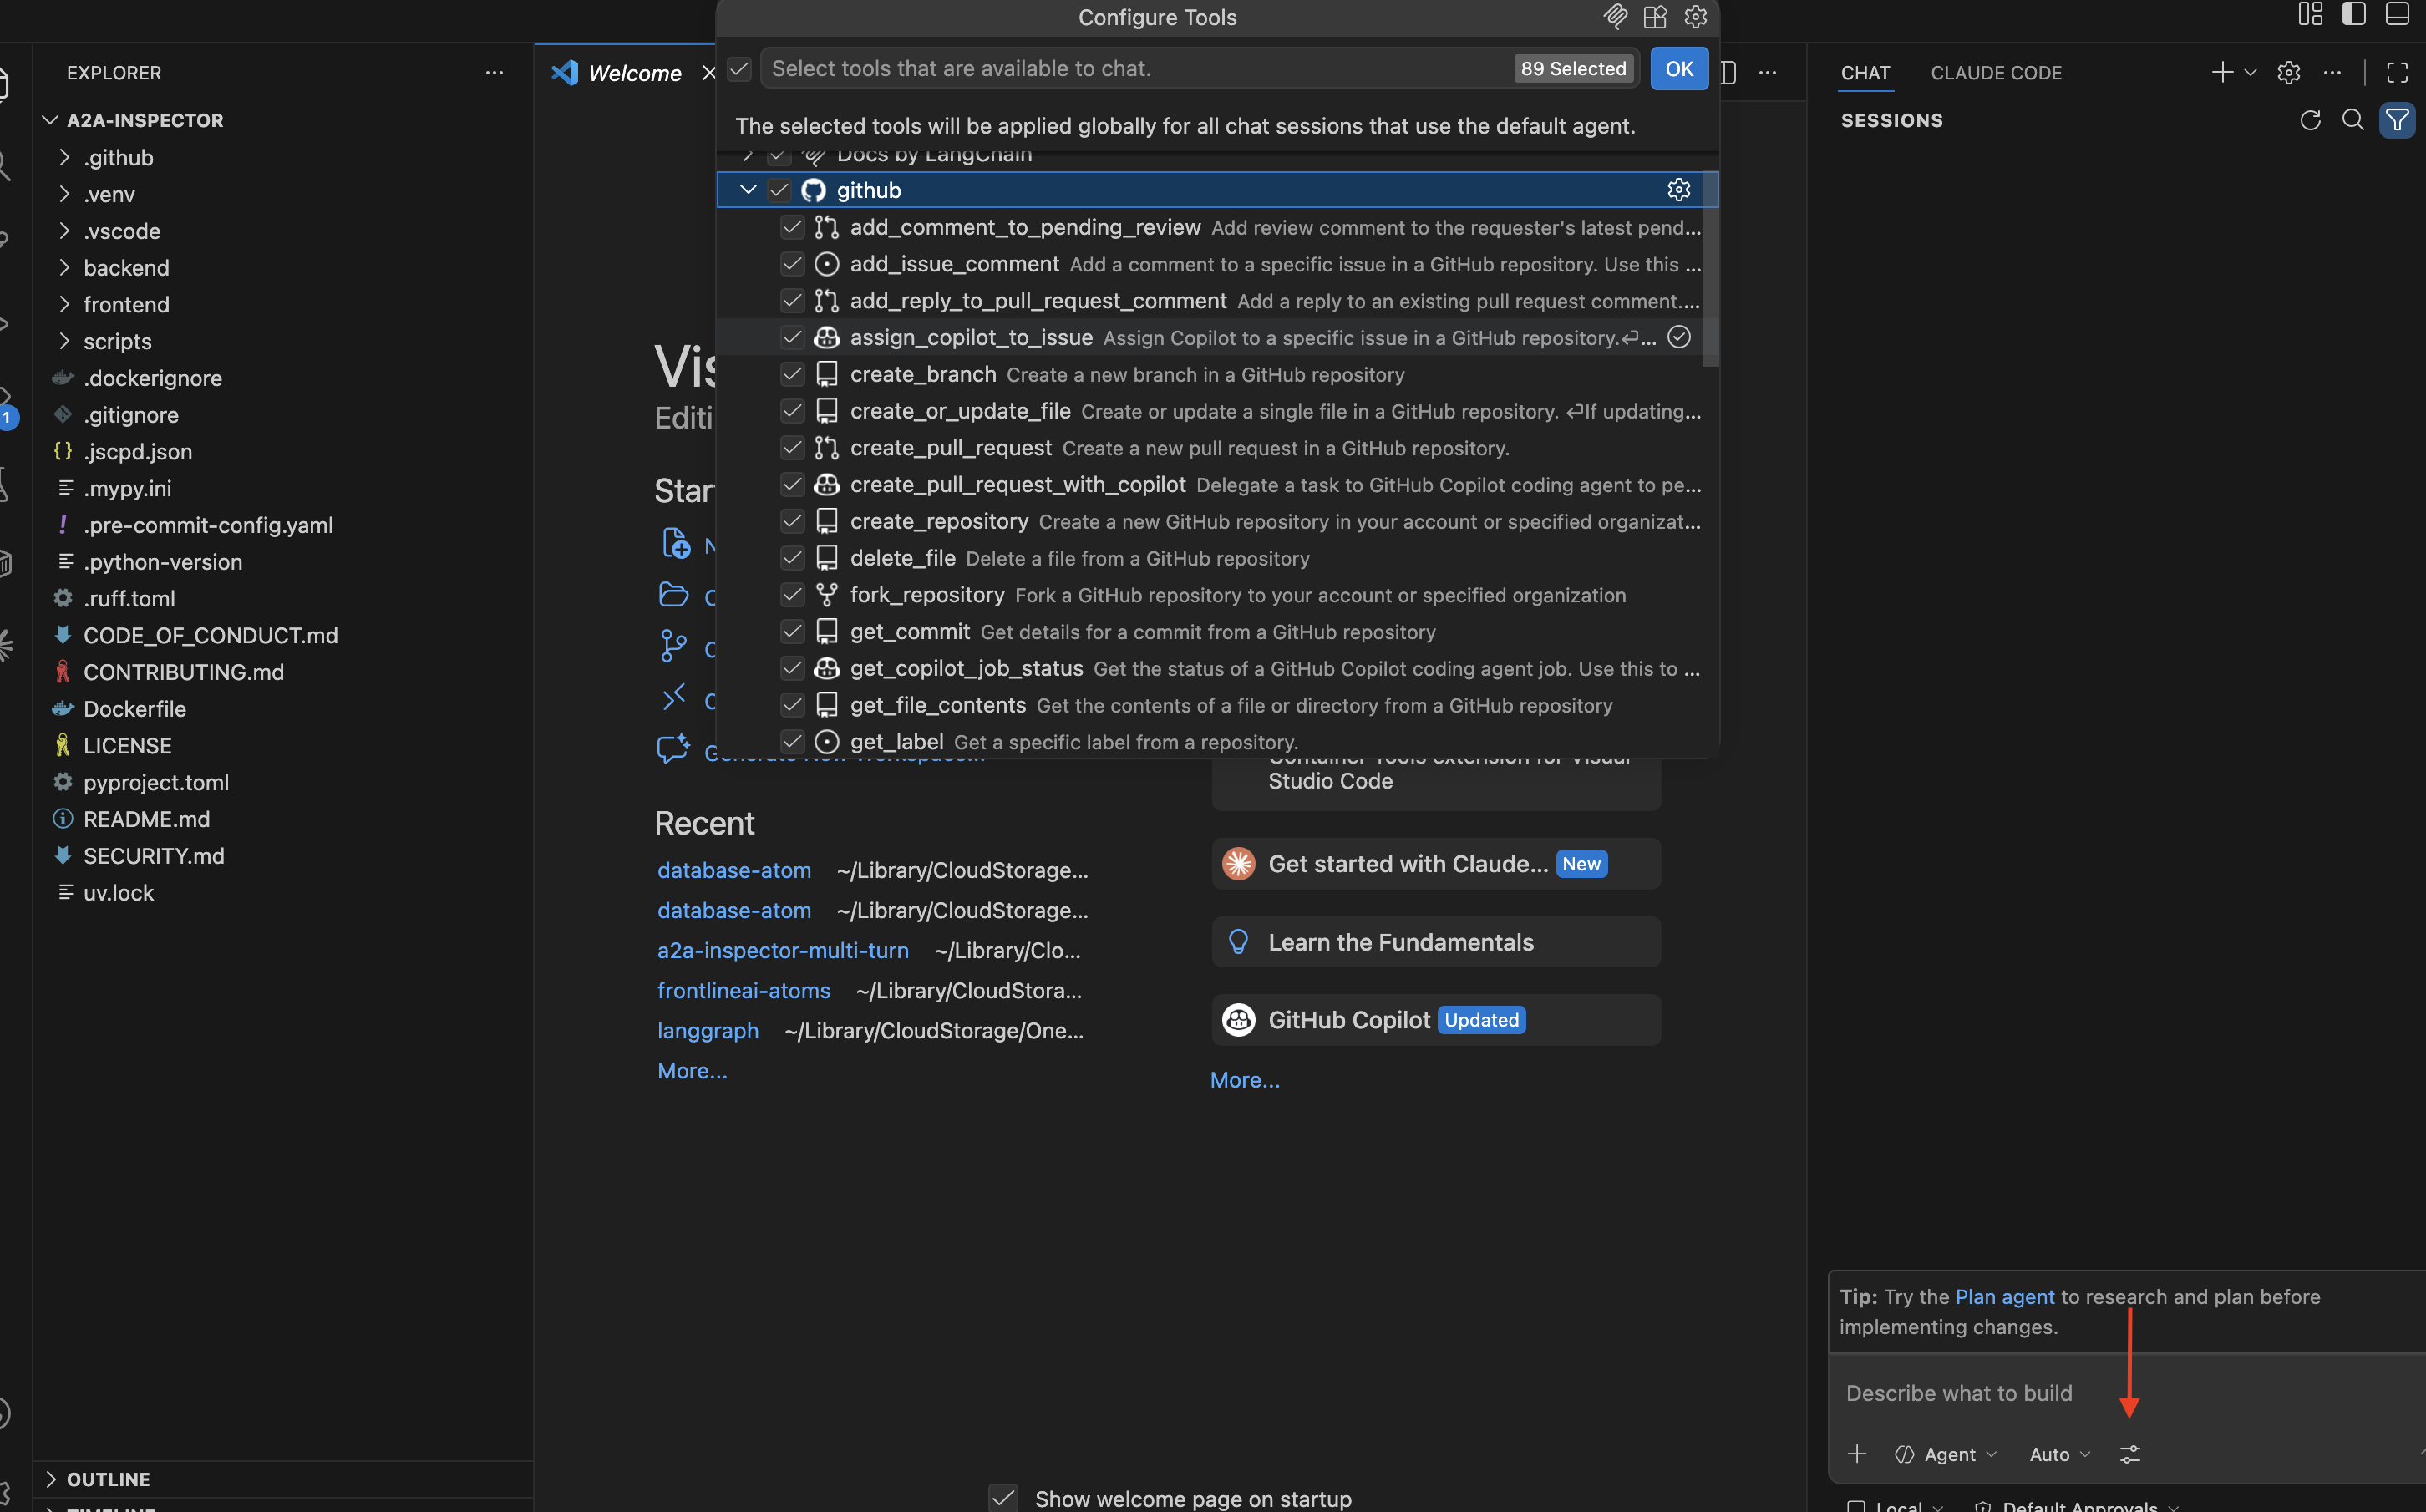
Since GitHub offers an MCP server, install it in your favourite AI IDE using the GitHub MCP server guide. Once you have installed the GitHub MCP server, you should see the list of AI tools available via the server.
Once you have configured the GitHub MCP Server, you can run the BMad workflow. When you reach the PRD generation step, provide the agent with the knowledge to use the GitHub MCP tool, treating the issue you are working on as the first mandatory epic to perform.
A good instruction for John (PM) agent to use the GitHub MCP Tool can be:
*create-prd using the issues provided on GitHub repository. To collect GitHub issues, use the GitHub MCP tools 'issue-read' and 'list-issues'. In addition,
keep in consideration that the first activity will be the resolution of the issue <number_of_issue>
This prompt will guide the John agent to collect all issues from the repository, gaining knowledge of the main problems and new features to develop, so that the PRD will be compliant with the current project roadmap.
After the PRD generation:
Ask someone with expertise on the project to review the documentation generated by BMad for evaluating the reliability of that documentation.
Follow the BMad workflow, but check that your first epic will be connected to your issue, such that at the end of the workflow, you will have your first issue solved with BMad and ready to push.
Before creating the PR, perform an e2e test to evaluate the implementation provided and to be sure it reflects your expectations.
If everything works correctly, run the “Validation” workflow which is a particular workflow that allow to sprint-manager, architect and product-manager to check that the implementation provided is compliant with the tasks and documentation.
Tip: Since the project does not have any documentation, the best approach is to use a smart model like GPT 5.4, Claude Sonnet 4.6, or Claude Opus 4.6 to generate the best documentation possible.
Conclusion
BMad offers a set of smart agents that help you quickly gain knowledge about a specific project, even if you have just been involved or have only a subset of the required skills.
How you configure BMad inside your project depends on three factors:
Personal knowledge of the project and its tech stack
Team involved with the project
Timeline defined to implement the most critical features and/or fixes
The real strength of BMad lies in your customised workflow, which uses strategies tailored to your project. By creating a personal workflow, you can avoid generating multiple iterations with agents before generating the desired output.
On the other hand, keeping everything documented and up to date can be hard, especially if you are in a rush and your manager or customers require the feature as soon as possible. In this scenario, the quick flow workflow is the best approach, since it focuses only on feature implementation.
Extend your BMad agents with MCP tools to provide additional instruments and knowledge, and use the smartest models for documentation and planning phases. The minor and easiest tasks can be assigned to agents with the cheapest models, since they should be fairly deterministic, and don’t require much reasoning.
At Nearform, we apply AI-native engineering to projects ranging from greenfield to brownfield. If you're sitting on a brownfield codebase that's slowing your team down, we'd love to talk to you about how Nearform could help you bring BMad and other AI-native engineering practices to get it shipping again.
Finally, if you found this introduction interesting, be on the lookout for future articles on topics such as BMad agent and workflow customisation.
But wait - there's more.
Nearform publishes real-world learnings on data & AI, engineering, and digital strategy - with more merged in weekly.
Insights
Perspectives on AI in engineering, product development, and strategy, for enterprise executives.