Getting into open source for the first time
Open source can be a thrilling hobby. My own contributions include projects like an IoT & Robotics framework and a Microservices framework , to name a few. The breadth and variance of open source mean that anyone with a text editor, terminal, and an internet connection can help build some really cool things with really cool people.
Tools of the trade
Specific tooling requirements vary depending on the particular language or environment you are working with. In most cases, along with any Software Development Kits, or SDK’s, having a GitHub account , a robust text editor , and Git installed on your machine should be all you need.
Types of contribution
A good open source project has input from people of many different disciplines. Not all contributions need to be to the code proper. There are many different skills that come together to form a good project; ability to code is only one of them.
- If you have design skills you could create and contribute assets for use in the project, it’s social media accounts, or it’s site.
- Frontend skills can be put to use creating a project’s home site, interactive samples, and tutorials.
- Anyone with a flair for writing can contribute to the documentation. Every OSS project out there could benefit from more quality documentation.
- Tests! A project can never have enough tests and benchmarks. The quickest way to a maintainers heart is via tests.
By not focusing solely on the code portion of a project, the work available to do greatly increases. Taking on work outside of your comfort zone is a great way to expand your skillset; working on documentation, or tests in another language than your primary, is a great way to get real-world experience in that discipline.
Selecting a project
A big issue for people new to open source is simply selecting a project to help out on in the first place. The advice I always give here is choose something that interests you. Below I’ve listed some points to consider when making your decision:
- Does the project want or need outside contribution? Not every project wants or needs outside help. There are lots of projects that exist solely to scratch an itch, as experimentation, or even as a personal fork to play with ideas. In general if there is no contributing guide or no specific call to help it may be that the author isn’t accepting contributions.
- Does the repo’s purpose interest you? Working on a project when you are not really all that interested in the project itself never ends well. Open source contributions should be challenging but fun, if you are unhappily slogging away on a given project you may need to reevaluate your continued contribution.
- Are you happy with the project’s license and policies? Some projects have clear policies in relation to its license and contributions, some don’t. Before pulling the trigger and jumping in, it may be wise to do some research here. As an example, I rarely contribute to anything that has restricted licensing, including GPL. It’s a personal choice, but one that needs to be made before you start contributing.
- Is the repository active? Are there any outstanding issues and pull requests? Contributing to a dead repository is no fun and reviving one is no easy task. On the other hand, dead repo's make great starter projects.
- Is there work to be done for your skill level? The best repositories to work on are ones with work available you have the skills to tackle. Check the issues tab, run through the docs, look over tests. If there is something that needs to be done and you feel you can complete it, go for it!
Keep an open mind about what projects you would like to work on and also the varying ways which you can help out. Sticking within your comfort zone is boring!
Contributing, step by step
Contributing to any repository follows a familiar pattern of steps, once you cycle through these steps a number of times on different repos, the speed at which you can contribute greatly increases.
Create a fork
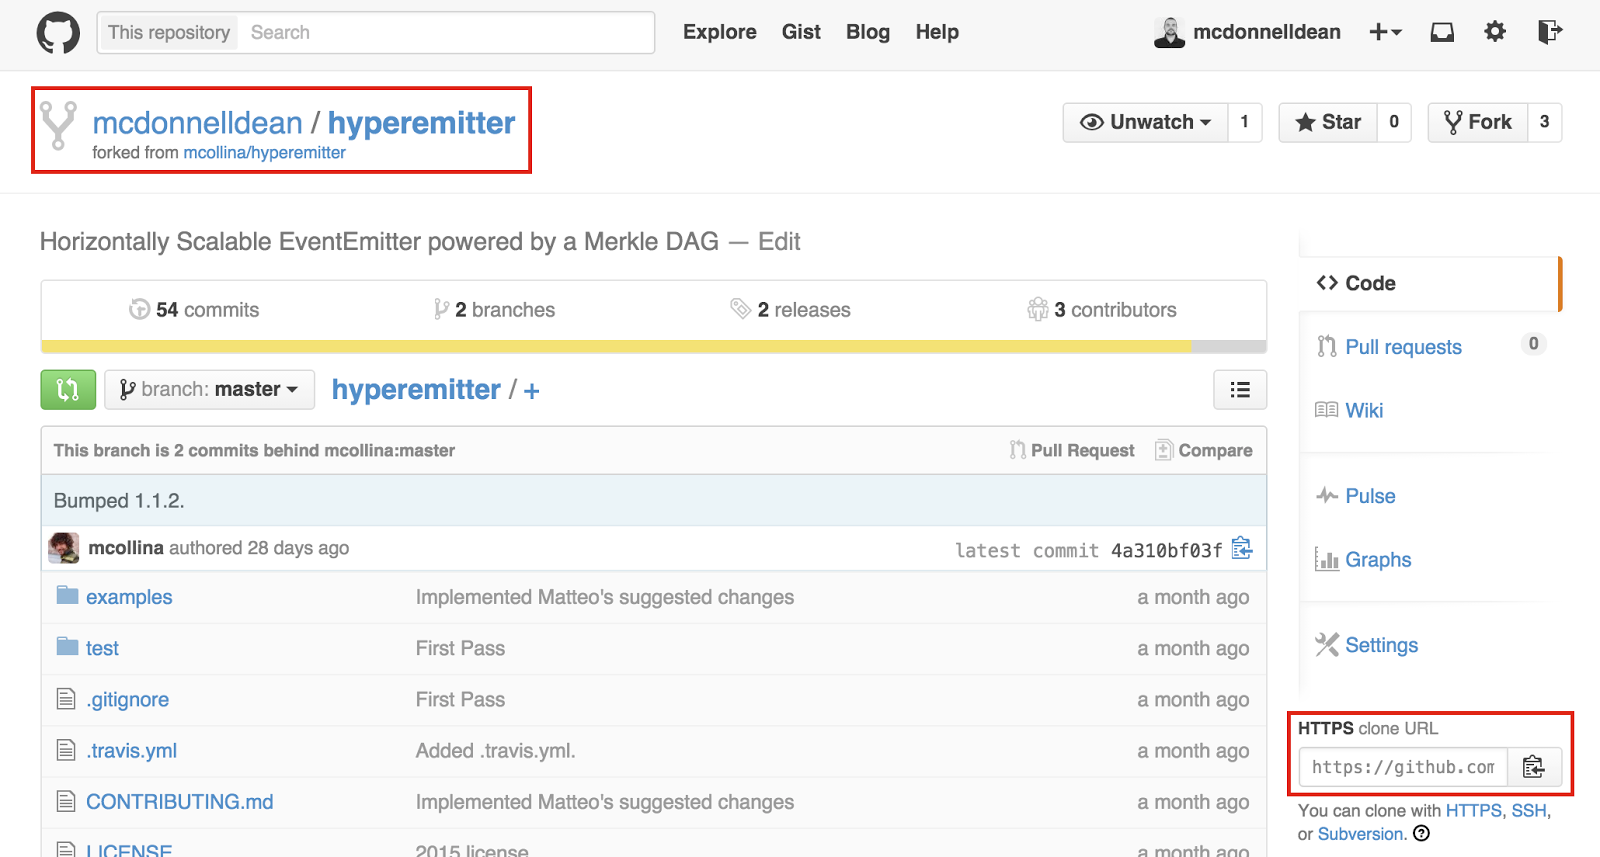
Navigate to your chosen repository on GitHub. In the top right hand corner of the page, notice a small button named fork . Hit that to create a linked copy of the repository under your username.

Clone a local copy
Navigate to your newly created fork, it will be named the same as it’s parent. On the right hand side a clone link is presented. Hit the button to the right of the link to have it copied to your clipboard.

Next, on your machine select a location to clone this repository, navigate to this place using whatever console app you prefer and enter the command below, you only need to type, git clone the rest can be pasted from the clipboard.
git clone https://github.com//.gitA local copy of your repository will now reside in a folder named the same as the repo’s name in your current working directory .
Set up remote tracking
The local copy you just made needs to track both your remote repository as well as the original repository it was forked from. By default, when cloning, a link is created back to your copy but not the original fork. Let’s check what remote links are present:
git remoteYou should have one remote named origin and may have one either named after the original author on GitHub or named upstream. By convention, GitHub names the direct remote (in this case your copy) origin and the forked copy upstream but this is not a hard requirement, many people instead name their forks after the forked author.
Since your repository is most likely missing the upstream remote, let’s add it. If we navigate to the original repository we can use the same copy button to copy the fork’s URL:
git remote add upstream https://github.com//.gitRun, git remote a second time to confirm the remote was correctly added, if it was you should see both origin and upstream listed.
Create a feature branch
In general, any changes made to a repository should be on a branch. All repositories will have a master branch, which usually represents the latest clean version of the repositories content. Unless otherwise stated by the repo owners this will be the branch you should base your feature branch off. Let’s first ensure we are on the master branch:
git checkout masterNext, we are going to create a copy of master, as it is currently, on a new branch, which we can then modify without fear of breaking anything.
git branch -b name-of-branchIn general, one branch equates to one PR. Keep branches focused on a single concept. If you need to add multiple features it may be better to create multiple branches, and later, multiple PR’s, rather than sending a single gigantic PR to the upstream repository. Smaller branches, and therefore, smaller PR's are always easier to work with from the remote repositories point of view.
Commit contributions
A commit should be created every time it makes sense to do so, for instance, if you need to fix a bug, add a feature, and update tests, each should be done in a separate commit. Think of commits as natural checkpoints in your work.
Before you commit, you must first “stage” your files. Staging is a way of grouping together a set of modified files to add to a commit. Only files specifically “staged” can be committed. To stage all files for commit, run:
git add --allIf you need to be more specific with what you need to stage, you can also stage a single file at a time using paths relative to the repository’s root directory:
git add lib/my-file.jsYou can also check the current status of the repository using, git status which will tell you which files are modified, added, or deleted, as well as what is and isn’t staged for commit.
When you are happy with your staged changes it’s time to create a commit and give it a message. Simple commits can be done like so:
git commit -m “Fixed Bug”For bigger commits, Git supports multi-line messages. By leaving off the closing double quotation mark and pressing enter, Git will insert a new line which allows list style messages to be created as below. Notice that once the second double quotation mark is added the next enter key press will complete the message and save the commit.
git commit - m “Added Feature
- updated function to include callback
- merged to and from logic
- removed semicolons”
If you need to construct more complex commit messages you can tell Git to open up a text editor when the -m flag is missing. Simply set the following in Git, Where EDITOR is the named command you would use in the terminal to open this editor.
git config --global core.editor "EDITOR"From here it is simply a case of using git commit When you push enter Git will detect no message and open up your editor of choice. When you have completed the message save and exit from the editor, Git will pick up your changes and use them for the commit message.
Staying up to date
Your copy of the original repository will invariably become stale. To keep up to date is actually very simple. First, we need to check out the master branch:
git checkout masterNext, we need to rebase our master branch so that it matches the upstream master branch. Rebase is too complex to detail here but essentially it rewrites your master branch so it matches the upstream master branch exactly .
git pull --rebase upstream masterRebase is destructive and may rewrite your current master branch. This is ok since we always want our master to be in line with the upstream. We need to tell Git to force update our remote fork as it will reject our update if it detects changes via rebase by default:
git push -f origin masterFinally we need to check out our feature branch and rebase it with our local copy of master. This will yank any current commits we have and place them at the end of the commit list. The importance of this will become apparent when we create our PR, the receiving repo will see our commits on top of theirs which makes merging much easier.
git checkout my-branch
git rebase master
Prepare pull request Pull requests are created on GitHub’s website. Before creating a pull request we first need to push our branch up to our fork. It is good practice to first ensure your fork and branches are up to date, refer to the section above on how to do this. Once up to date we need to push our branch up to GitHub:
git push -f origin my-branchTo create a pull request, navigate to your fork and hit the pull request button on the right-hand side of the repository explorer. Make sure you are on the right branch, by default, master will be selected but you can change to your branch using the branch drop down to the upper left of the pull request button.

Before you do, take note of the detail to the left of the pull request button. It will tell you how many commits ahead you are (these will be included in the PR) and how many you are behind (a pull and rebase is required). In general, you should never submit a PR that is behind, if you do, you will inevitably be asked to update.
Having your code reviewed
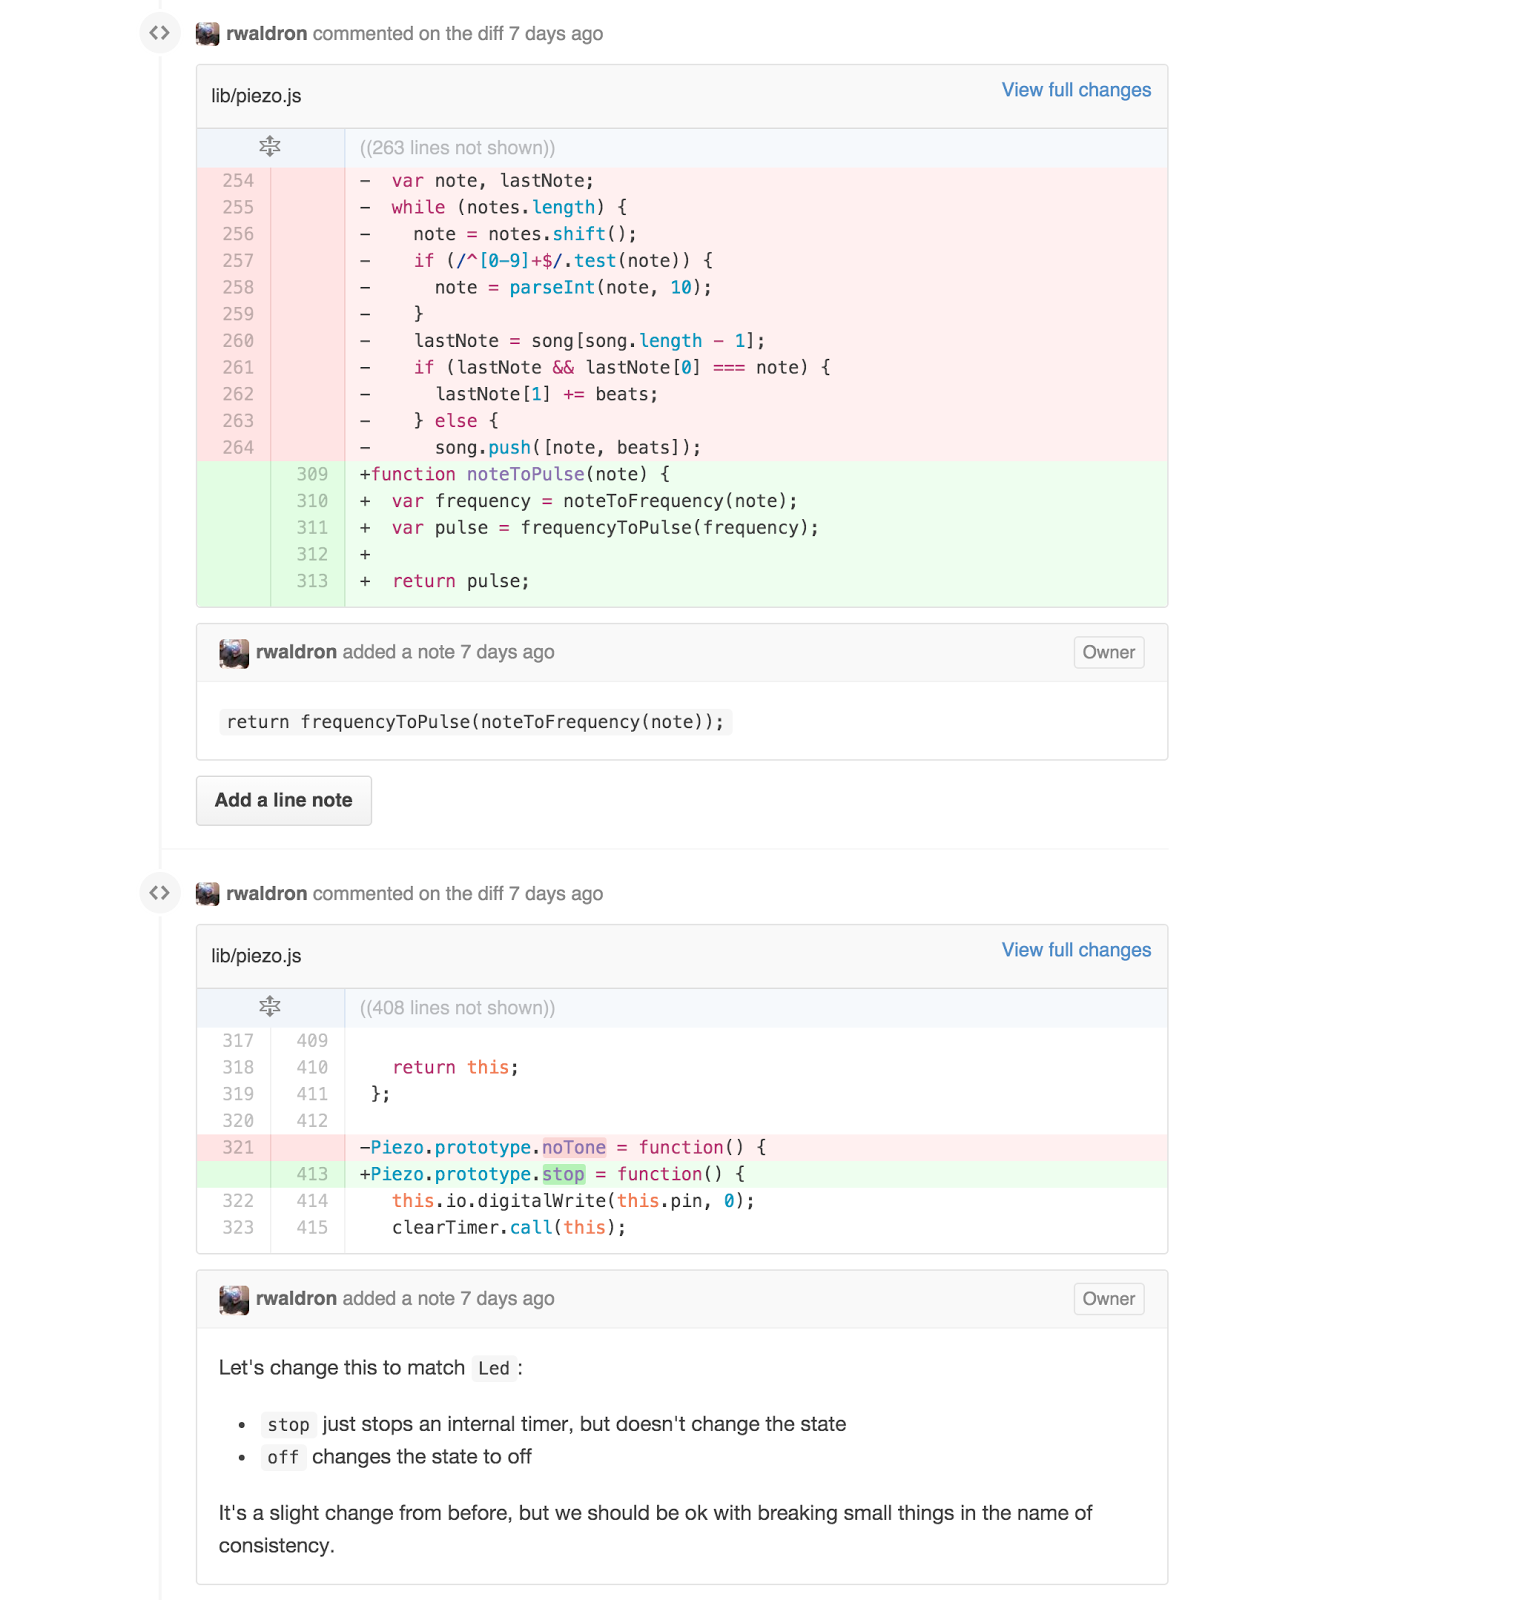
Depending on the contribution rules of the project, you may be subjected to a pretty lengthy and sometimes intense code review. While these can seem disheartening, look at them as a learning experience. Sometimes it may be that your changes simply need some tidying up, other times the way you went about solving a problem doesn’t fit with the repositories overall theme.
Generally, the advice or direction given during a code review is designed not only to improve the PR but let you have the experience of making those improvements yourself. This means you may be asked to redo or otherwise change your PR. The language may be neutral or questioning but most project owners understand the importance of letting a person make any changes needed themselves, rather than doing it for them.
A review should never be personal, it is the code, not you, that is up for review, with this in mind the following is never ok:
- Name calling, snideness, chiding, insults, or mocking.
- Comments and/or assumptions on your gender, sexuality, or other personal detail.
If you feel a review has become personal, depending on the circumstances you may be able to have a discussion with the repository owner to resolve any issues. Otherwise, it is simply better to drop the PR and move on. Like any massive gathering of people, there are good apples and bad apples. Focus on spending your energy on positive experiences.
Fortunately, many open source projects now have an express Code of Conduct or Contribution Guide to ensure that sound policies and procedures are in place, understood, and most importantly, enforced. A project with a solid Code of Conduct or Contributing Guide is usually a better place to spend your effort than one without.

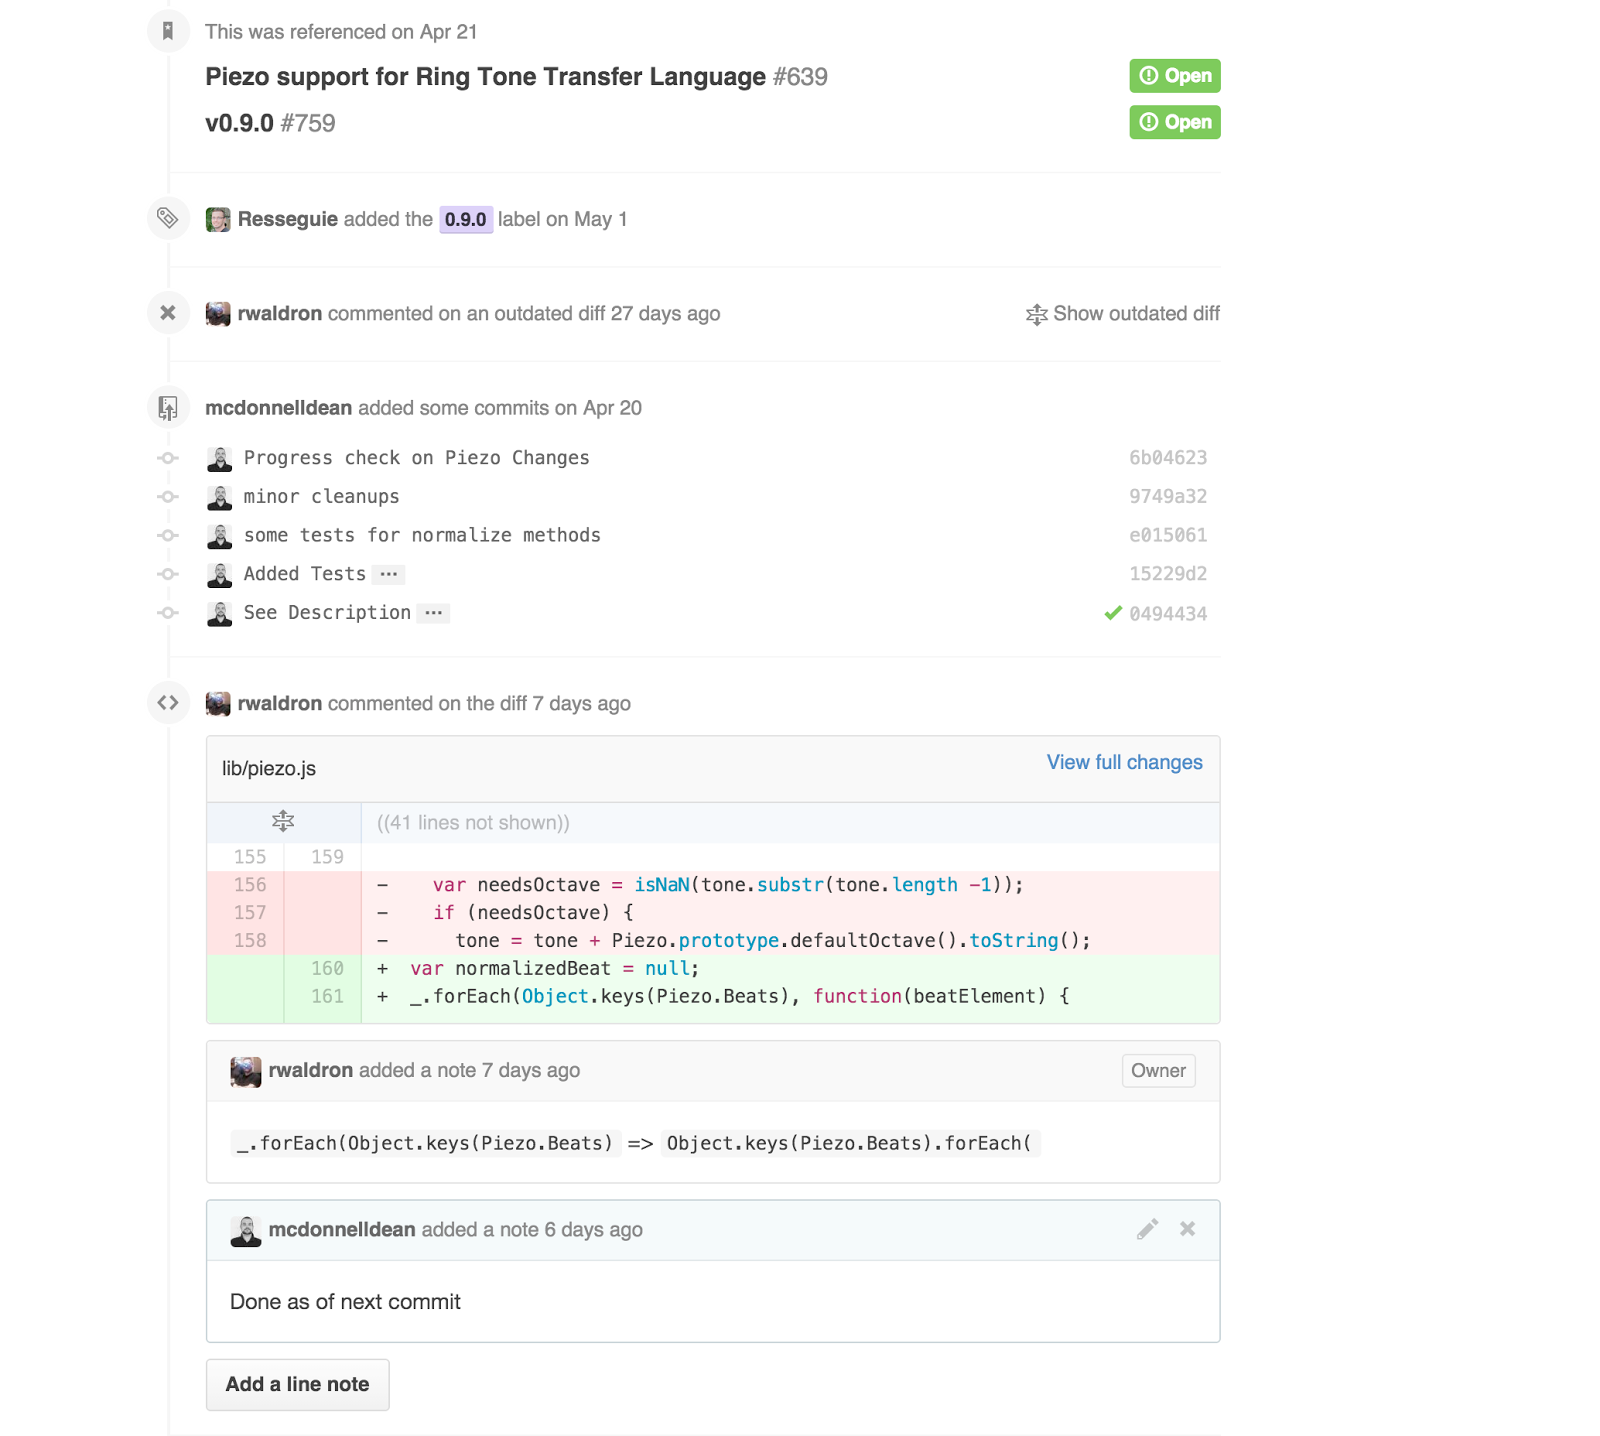
As your code is reviewed a timeline is created under the PR, each commit added and any notes from reviewers are all listed in the same place. This cycle may repeat a number of times, it’s not unusual for multiple extra commits to be required before a PR is accepted.
Handling rework requests
As mentioned above, after a code review, you may need to add more commits to your pull request for any rework that needs to be completed.

Luckily as long as you keep adding commits to the same branch and then pushing them to your fork, the PR against that branch will be auto updated. If any of your changes outdate the previous diff, GitHub will automatically hide any associated comments, this allows PR’s to evolve without becoming overcrowded with older review messages.
Acceptance
When your PR has been accepted you will need to pull the changes back into your fork, via your local repo. This is the exact same process as keeping your repository in sync, as listed above.
git checkout master
git pull --rebase upstream master
git push -f origin master
All that is left to do is clean up your local and remote branches by removing the now unneeded feature branch in both places.
git branch -D my_branch git push origin --delete my_branchFrom here, to kick the process off again simply checkout master, create a new branch, rinse and repeat. It is important to note that just because your changes are now in the main repository, it does not mean they have reached users just yet. Generally, a release is a bunching together of many PR’s into a single public release. There may be more work needed around testing or documentation to be done for the wider release. A perfect time to roll up your sleeves for another outing.
Conclusion
Open source is both thrilling and mostly a joy to do. Using the information above it should be easy, with some practice, to get working on some cool and interesting projects. It’s important to remember that everyone in open source started the same way, all you need to do is make the first step. You can also check out some of the Open source projects we maintain.
Insight, imagination and expertly engineered solutions to accelerate and sustain progress.
Contact